Unit 7: Freerunner
Introduction to Unity


Importing into Unity


Research: Substance Painter/Designer

During this unit I decided to research a different software that is used by many professionals to texture in-game objects and character models. From what I have researched it seems to be a really useful and helpful software that provides a lot of possibilities in this area. I also found out that a variation of this software, Substance Designer, is used to texture architectural and game environments as a whole.
Initially, to get used to Unity, I experimented with it creating a small scenario that would imitate an isolated tropical island which was rich in fauna. This experimentation allowed me to get used to many of Unity's tools, including texturing, tree and grass tools. I also decided to go a bit further and try to include water, which was tricky to implement as I had to scale it to a perfect size so that it would fit due to the shapes of the lakes that I had created. Some of the testing that I did not show includes inserting vehicles such as a car and jet as well as attaching a camera on top of them to have some control over them. I also experimented with First and Third Person Controllers, the latter one being trickier as you also had to implement a camera on top of the used character.
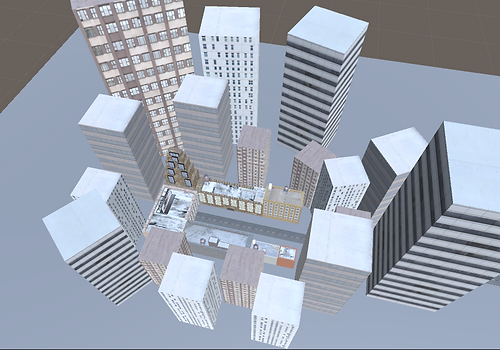
After my experimentation I was tasked to import my NYC project onto Unity. This was a simple task. To import it onto Unity I went to Maya and chose the "Send to Unity" option. I chose the Assets folder in my Unity project, and after selecting it I checked an option called "Embed Media" which would also include all of the textures that were involved in the creation of my project. This was certainly the most important step as if I had skipped it none of my textures would've exported onto Unity. I also had to adjust the scale as the buildings were too big compared to the character. I also had to activate the colliders when importing my project so that it was a solid surface.
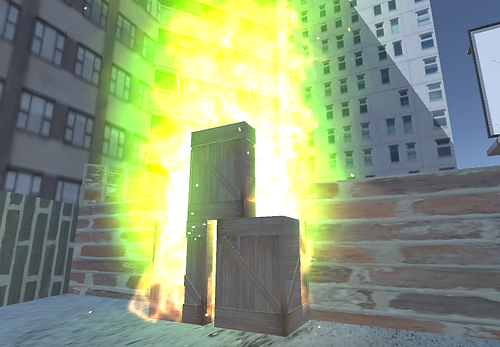
One of the first things that came into my mind whilst experimenting on my project was inserting fire somewhere, and the most obvious object that came to my mind were the crates located throughout my city, therefore I decided to insert some fire and position it around the centre of the crates so that it would seem like they were all on fire, and proceeded to play around with its settings. Whilst doing this I figured out how to change its colour, and decided to keep it as a greenish flame because I thought that it stood out more.
Although in this image it isn't very clear, I am showing some smoke that's coming out of the air vent. I inserted this into my city onto both of my air vents so that it seemed more realistic and life-like, as real life air vents usually have some smoke or air coming out of it. I had to adjust the settings of them so that they lasted longer and were also more visible.
I took this image to show what my other crate looks like compared to the other ones whilst on fire. This one was easier to place as the size of the fire didn't have to be as big because in this case it is only one crate.
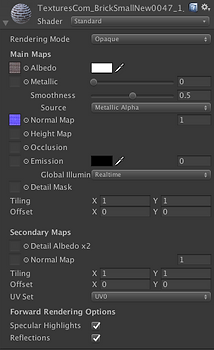
These two screenshots show my first experimentation with normal mapping. In my opinion, normal mapping is amazing as it gives the textures a greater sense of realism which improves one's experience whilst playing a game level that was textured using it, as normal mapping also makes the textures show reflections. To do it I created a copy of the original textured and inserted it onto the normal map option so that Unity would attempt to change it itself.
The reason for this screenshot was to check how the city is looking in unity right after it being imported and having introduced the fires and smoke on the air vents as I wanted to check the scale and how realistic it looked.
After experimenting with normal mapping I decided to try it out on every texture and keep it based on if it looked better or not. These are the second and third textures that I normal mapped, and I was really pleased with the result as in my opinion the windows look a lot more realistic and the reflections also look real, unlike before where they looked extremely simple and the bricks look like actual bricks that fit in with the lighting.
This is the fourth texture that I normal mapped, these building windows. I really like this result because I think that the window frames look a loot cleaner and realistic whereas before they seemed to be a bit more dull and simple which made them boring to look at in my opinion.
The fifth texture that i normal mapped was this building. The upper ledge looks a bit weird, but this is because of the lighting from this angle as when I looked at this ledge in-game from the opposite building it looked fine, however I may adjust the settings so that this doesn't become obvious from some angles that I have not tried out yet. I was slightly disappointed with this result, due to how weird the lighting is on the ledge from below, and I may revert this building to a plain and simple texture in the future.
This was the sixth texture that I normal mapped and it was a really disappointing result. However, I managed to fix this by adjusting the settings so that the normal map doesn't affect it as much and that tweak made the building's texture look more normal and therefore realistic.
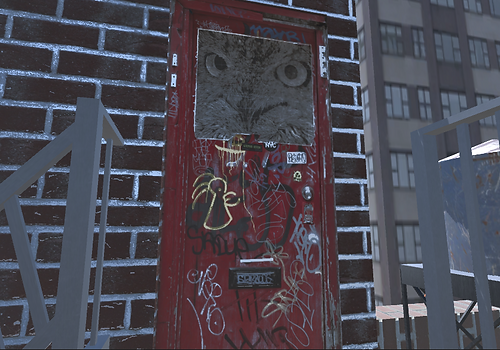
After texturing the buildings I went onto my seventh texture, which was one of my doors. I really liked how the normal map looked on the door, as the colours became more lively and gave more like to this building, whereas with a normal texture it looked a lot worse. The normal map made everything look realistic, even the image of the owl that's a part of the door.
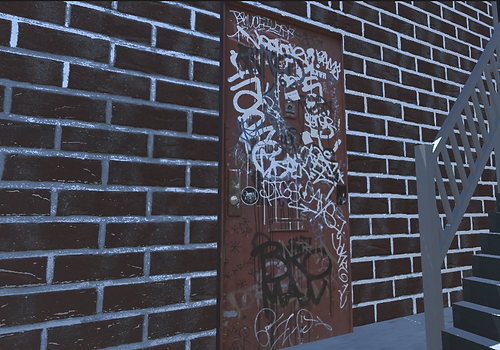
Seeing how successful the first door looked with normal map I decided to move onto my second door, which is the eighth texture that I normal mapped. I liked this one a lot because of how the graffiti looks on the door with the normal map, it really reminds me of how doors look in real life.
This is my ninth normal map, as well as the first full building. I decided to take a screenshot from this angle up close to show the reflections, as I was impressed by them and wanted to show them. I had to adjust the settings on the normal map to make it look good as the default settings made it look too bright.
This is the tenth texture and second full building that I normal mapped. This is probably the worst result that I have gotten, as it didn't really change too much other than adding a bit of reflection that can be seen towards the upper half of the building.
This is the eleventh texture that I normal mapped. I was pleased with this result as it makes it makes the air vent's texture look like it's real metal due to the reflections and specular highlights. I also normal mapped the supports, but they didn't change much so I reverted to normal textures.
The twelfth and thirteenth textures that I normal mapped were the staircase's supports as well as the inner face of the stairs. The supports didn't change much but the inner face of the stairs seem more realistic due to the reflections that the normal mapping added to them.
This is the fourteenth texture that I normal mapped and probably my favourite alongside the doors as the crates look really realistic to me and remind me a lot of how crates look in real life as well as many other realistic games that I have previously played, which made me very pleased with the result.
This is my fifteenth normal mapped texture, the floor of this rooftop. I think that this texture looks a bit better normal mapped but it might be a bit too bright with this lighting, so I may consider to tweak the settings of the normal map to make it a bit more realistic. Despite this I am pleased with the result and think that it looks a lot better than it did previously.
The sixteenth normal mapped texture is the floor of a different rooftop and in my opinion it turned out really similar to the previous one. However, it is distinguishable and through the First Person Controller it looks fairly realistic, although a bit too bright once again.
This screenshot is to show that I have changed the sky box and lighting of my NYC project to one that was more to my liking. I think that this sky suits my level a lot more as well as the lighting as it gives a sunset look that would shine in through the gaps of the buildings in the background.
Unity Development
This is a short video that I made demonstrating my experimentation with how the physics worked inside Unity by using the First Person Controller with some added scripts to it to grab the ball and move it around. To add physics to the ball I had to first spawn it onto the level and then add a "RigidBody" to it so that it would move around when you touched it. I also experimented with some other functions, such as making the ball act like it's bouncy, like it's ice and many other things, such as wood, which gave me a demonstration of how physics works in unity.


Final Walkthrough
Project Evaluation
The hardest part of this project was configuring the First Person Controller and the sphere that I used to add physics to my level as to make the First Person controller be capable of grabbing objects I had to add some extra scripts as well as add a rigid body to the objects that should be able to be grabbed and moved around. The easiest part was importing from Maya to Unity as it was really simple and didn't have any complexity to it.
My favourite part during this project was experimenting as I enjoyed creating my own landscape and adding water and fauna as well as adding some vehicles and experimenting with them. For example, I added a car onto the landscape and attached a camera to it which allowed me to control the car from its own point of view. I also experimented this with a jet plane and this allowed me to fly the plane around the scene. I also learned how to add water to a scene, which will be useful in future projects.
I'm happy with the outcome of this project as I think that my scene is really realistic and is correctly designed to be played as a freerunner while remaining true to the aesthetics of New York City, which is what this project was based on.
If I could start this project again I would re-texture everything introducing normal mapping as this method of texturing adds a lot of realism to the buildings and objects that are found throughout my level. I would also try to include some scripting for things such as climbing ladders.
Physics Experimentation
Timeleap
Main Idea: Bombing of Guernica
This idea consists of creating an environment around the Bombing of Guernica that took place during the Spanish Civil War. This environment would include some of the Nazi planes that caused it as well as a mix of buildings and ruins to portray how the city was before and after the bombing. I would also include art and propaganda from the time, including the Guernica painting from Pablo Picasso. The environment would be divided in two halves, the first one would be in ruins including explosions and Nazi planes that represented the bombings and despair of the time. The second half would be modern buildings that portray the reconstruction of the town.
The art and propaganda in the ruins would be found throughout the walls of the ruined buildings as well as on collapsed walls and on the ground.
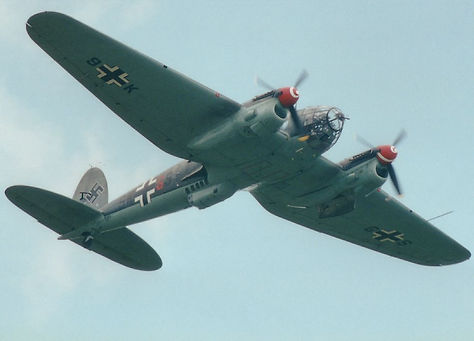
The modeled planes would be the Junkers Ju 86, Heinkel He 111 and Dornier Do 17 as they were the main bomber planes that carried out the attacks.


Research images
First Person Controller
Sphere + Sphere Collider
Guernica Painting (Picasso)
Guernica during/after bombing
Propaganda
Guernica reconstructed
Junkers Ju 86

Heinkel He 111

Dornier Do 17


Luftwaffe 1 kg incendiary bomb


Things to model:
-
Guernica during bombing (1 half) - destroyed buildings, explosions, fire on some buildings, propaganda from the time on the walls of some buldings, Guernica painting as a reference to Picasso
-
Guernica modern (1 half) - buildings
-
Luftwaffe 1kg incendiary bomb - for the Guernica half during the bombing, will be placed throughout the area on the floor. One bomb will be made and it will be duplicated multiple times throughout the area.
Destroyed buildings


Models
Luftwaffe
Top
Bottom

Destroyed Buildings
Unity Scene


Modern Buildings


First Idea


This was my original scene for my timeleap project. It would have a city that was made up of two sides, one of them with modern buildings and the other one with destroyed and old buildings. However, I decided to scrap this idea because the amount of buildings that needed to be textured was too high for the amount of time that I had.
This is a slightly more advanced screenshot of my old scene. It shows the texture that I used for the floor as well as the one that I used for the destroyed side, which I painted on with the brush. I also applied normal mapping to my destroyed buildings to make them more realistic.
This is the Luftwaffe that I modelled and textured for my project. I did all of the modelling in maya using a mix of techniques that included moving vertices, edges and faces. When I finished modelling it I had to separate it into two pieces to take it into a different program called Substance Painter to texture it.To sepaarate them I had to carefuly select the faces of the bottom part and used the tool "Separate", which made those faces be a different object. After doing this, before taking them into Substance Painter, I created a new material for each one which I named accordingly. I also had to apply and resize the UV mapping so that the texturing and materials worked in Substance Painter.
At first, Substance Painter was difficult as I had never used a program like it before. However, once I learned how it's used it was really useful and I was able to create these materials. I was able to showcase them in a 3D manner because of a special feature of Substance Painter, which allows you to export and upload your work to a website called Sketchfab, which then allows you to embed this onto your website.


Final Idea


Final Playthrough
This is a screenshot that mainly shows the modern buildings that are not destroyed. Changing my idea allowed me to focus more on quality over quantity, which makes these materials and textures a lot better and more realistic as I have made them in Substance Painter, whereas if I had continued with my first idea I would've textured them in Maya and thus would look worse.
This screenshot mainly shows the destroyed buildings. In the image you can appreciate the change of the textures in these buildings, as I decided to take the new building into Substance Painter for texturing. I was happy with the outcome and therefore decided to take the other destroyed buildings into Substance Painter too to re-texture them, which provided with a very pleasing outcome.
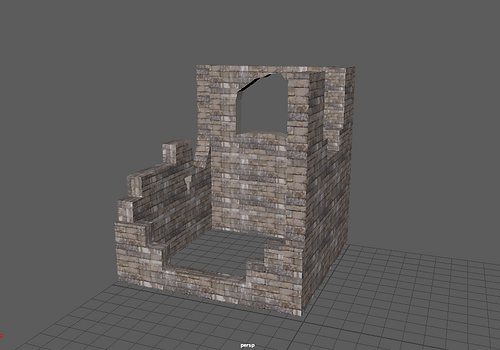
This is the first destroyed building that I created. The main tool that I used for this was the cut tool, which allowed me to freely create edges and this allowed me to modify it with ease. The difficulty part of this was creating similar enough lines on both sides of the walls so that the bridge tool worked, as what I did was deleted the faces to create openings and then closed the openings that led to the inside of the wall with the bridge tool.
This is my second destroyed building. I used the same techniques as in my first building but in a simpler manner to get a different outcome and therefore have variety so that it wasn't too similar to the other destroyed building but was still recognisable as one.
These wooden planks are some props that I made to simulate fallen supports from the building, as it looks like they collapsed when the building got destroyed and adds more realism to my project as a whole.
This is another extra that I modelled to add realism to the building's destruction. I decided to do this based on my research because I found many examples that had broken windows, therefore I modelled this one which looks like the side and upper part have been blown up.
I took this screenshot to show my third building as well as my window glass and the broken door that I have modelled for my second building. I used the same techniques as with the first two buildings, but tweaked a bit more the vertices and faces to make it look a bit more destroyed than the rest to add variety as well as realism.
This shows my third building fully textured, as well as the broken window's glass also textured. To texture my third building I individually took each wall into substance painter and carefully adjusted the material on them so that they each look unique in some way, applying different smart masks to each of them. For the broken glass I made the material for it be rendered transparent and then lowered the alpha on the albedo and changed the colour to a shade of blue.
I decided to include this close-up of my third buildings texture as I was extremely pleased with the outcome and wanted to include a better view of it so that the details could be seen.
I included this screenshot to show my newly textured window glass as well as to show the colour change on it. I also included it to show the new textures on my previous destroyed buildings, as they were also really good and I believe that from this angle you can appreciate the details on them.
Here I am showing the destroyed door that I made to simulate the destruction of the building, as it is possible that doors would be half-destroyed after the bombing. As in the previous screenshot I also used this to show in closer detail the texture of one of my destroyed buildings.
This is a view able 3D model of the debris that I created to place into my destroyed buildings. They were textured in substance painter and had some smart masks applied to them so that they looked damaged and dirty due to the explosions.
This is the first door that I textured, and is the only object that was not textured in Substance Painter. I made this decision because I was pleased with the result of this texture, and decided to not change it to use the time on a different object.
This screenshot was originally from my first idea. I kept it in because it includes the windows which I decided to keep as they added variety and in my opinion look good. The arched form was slightly tricky to created but I managed it through modifying vertices and faces.
This is a view able 3D model of the window that I modelled and textured for my modern buildings. This is one of my favourite textures due to the reflections that can be seen on the glass of the window. I modelled this on Maya and then textured it fully on Substance Painter.
This is a view able 3D model of my first variation of a door for my buildings. This was my first time fully modelling a door as I previously did not model the doorknob as well. However, the outcome was pleasant as my intention was to make the wood that the door is made out of look old or used. I also like the shine that the doorknob has, as I feel like it adds a lot of realism to the door.
This is a view able 3D model of my second variation of a door for my modern buildings. It is essentially the same door, but made out of steel instead of wood.
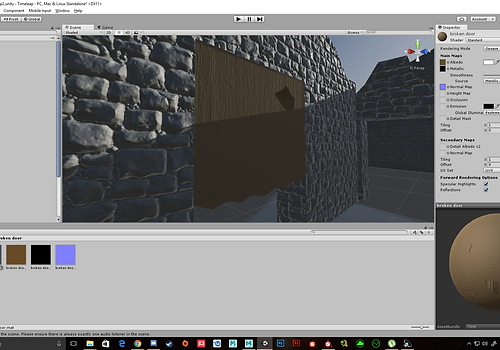
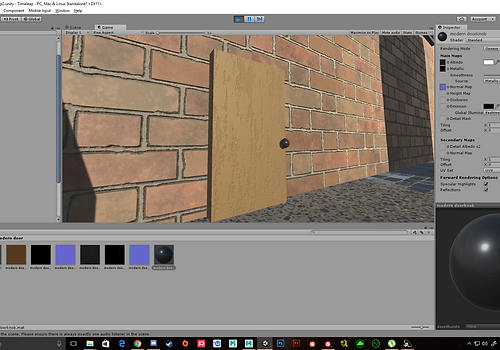
In this screenshot you can see one of the brick textures that I have made for my modern buildings as well as how the door looks in unity.
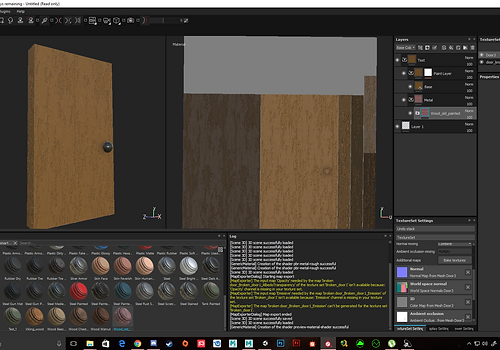
I took this screenshot of the first door in Substance Painter to show how I created it as well as how I work using Substance Painter.
I took this close-up screenshot of the doorknob in Substance Painter to show how I made it as well as how detailed it is up close, as you can appreciate the reflections on it.
This screenshot shows the new textures that I created for my buildings as well as how the Substance Painter windows look like in Unity. As seen in the screenshot, the windows are capable of reflecting the light. However, when looking at it from below you are unable to see the reflection of the light.
Project Evaluation
The project's theme was time-leap, which involved recreating a historic event as a game scene including free-running elements. I liked this theme as it allowed to create some cool effects such as explosions from wars or fires in an event like the Great fire of London.
The part that I enjoyed the most in this project was texturing in Substance Painter as I had a lot of fun trying out different materials and masks and seeing how realistic the textures and results were.
I have also learned new techniques throughout this project, as it is the first time that I've been modelling by modifying vertices and faces. It is also my first time texturing in Substance Painter, therefore I also learned how that is used. Another skill that I learned was scripting, as I created some scripts to make my Luftwaffe's to spawn and also explode when there's collision with it.
Throughout this project I researched how destroyed buildings were created in games. These influenced majorly as some aspects such as the debris or the props that I created were inspired by these game scenarios that I have seen. I also took inspiration from my research of Guernica and the Spanish Civil War as that's what I based my project on and what helped me model my bombs.
In my opinion the most successful part of my project is the textures on my buildings and objects as I personally think that they are really good and realistic.
If I could complete the project again I would texture everything from the start on Substance Painter as the results are thousands of times better than those achievable using Maya. I would also use my time more wisely and create one of the bomber planes that I wanted to model and texture as due to time management it is the only thing that I was unable to include in this project.
Scripts

