Project Ideas
Unit 13: FMP
Idea 1: RPG Genre
My first idea for my project is a game from the RPG genre, with a focus on action. It would be a third person game with a fantasy setting, where the main character would use magic. The concept of the game would be taken from my previous unit based around a game demo, as I liked the game concept that I came up with and would like to develop upon it using the base story and
ideas that I came up with. I would use games such as Darksiders 2 as reference because some of the environments from that game are similar to what I would like to do and the main character slightly fits the description of the one I came up with.
Idea 2: FPS Genre
For my second idea I would like to do an FPS game with some RPG elements, similar to games such as Borderlands. I would consider using a toon shader as I have previously experienced with it and enjoyed the look of it, however it would most likely be realistic as realism is really noticeable from a first person perspective.
Idea 3: 2D Platform game
The third idea that I came up with for my project is a 2D platform game based on famous games such as Mario or Sonic. It would include a similar life system, where you have a limited amount of tries before getting a game over and you have to collect certain objects to be able to take more hits before you die. It would have a variety of environments.
Game research
Action RPG: Darksiders 2

Concept Art
 |  |
|---|---|
 |  |
 |  |
 |  |
 |  |
 |  |
 |  |
 |  |
 |  |
 |
I chose to research Darksiders 2 for the action RPG genre as the theme of the game was similar to the idea that I came up with and it is a game that I have played in the past and enjoyed the gameplay, environment and characters. I chose to research the concept art of this game as well to have an idea of how they designed their assets as well as what the base models looked like to have an idea of how detailed their work was and what standard of quality they had.
FPS with RPG elements: Borderlands 2
Concept Art
 |  |
|---|---|
 |  |
 |  |
 |  |
 |  |
 |  |
 |  |
 |  |
 |  |
 |  |
 |  |

Borderlands 2 is the most popular shooter with RPG elements in it, which is why I decided to research it. I was interested in its unique art style and through this research I am considering using a similar art style in my final major project. This research also allowed me to find out the whole process the designers went through to design the characters as well as how the textures were created and implemented. I also had a look at what the base models of the main characters looked like and what they looked like textured to see which parts were modeled and which parts were implemented through textures.
2D Platformer: Sonic the Hedgehog

 |  |
|---|---|
 |  |
 |  |
 |  |
 |
Concept Art
I researched Sonic the Hedgehog as an example of the platforming genre as it is one of the most popular sagas of this genre and one of the most successful. It has been around since 1991 and is still releasing games, which makes it a prime example of a videogame sagas that has been successful for a long time. This is one of the major reasons for why I decided to research this game, as I believed using a saga that has been successful for a long period of time would give me an insight on why and how they achieved this, as well as their process on designing some of their game levels and characters.

I took these photographs whilst on holiday in Spain as I visited an area that had some buildings which gave a resemblance to what the type of area that I wanted to design for my game level. The image on the left was of a tower on the distance that was one of the buildings I had planned to create. The image on the right was of a building that had some designs that I wanted to have in some of my buildings, especially the windows which I took the most into consideration when modelling my level.
Project Proposal
Primary Research


Artist Research
 |  |
|---|---|
 |  |
 |  |
 |  |
 |  |
 |  |
I chose to research the artist and illustrator Gerald Brom as he did art for many role-playing games as well as for novels and comics, and the theme of this artwork interested me as it was similar to the theme that I was going for in my FMP. I used him as reference for what characters may look like at a medieval time as well as how enemies and environments could look like. Gerald Brom did work for games such as Doom II and Diablo III as well as movies such as Van Helsing and books like Lost Gods or The Child Thief
 |  |
|---|---|
 |  |
 |  |
 |  |
 |  |
 |  |
Frank Frazetta was a fantasy and science fiction artist who did work for comics, paperback books, paintings, posters and other media. He did posters for movies such as Fire and Ice or The Gauntlet as well as album covers for bands such as Wolfmother or Nazareth. I chose to use his work as research because I was interested in his character designs and wanted to take inspiration from this artwork to design my own characters.
 |  |
|---|---|
 |  |
 |  |
 |  |
 |  |
 |  |
 |  |
 |  |
 |
Takeshi Oga did concept art for both Gravity Rush games and was the stage designer for Siren: Blood Curse. I chose to research Takeshi Oga as an example for video game concept art. I used this artwork due to it being highly detailed which gave me an idea of the standards of concept art in this industry. I have also played the games that the artwork is from, which impacted my decision to research this person.
Izzy Medrano was a concept artist for God of War: Ghost of Sparta and God of War: Chains of Olympus, as well as a Visual Development Artist for God of War 3 and Lead Visual Development in God of War: Ascension. Izzy Medrano also did additional art for DOOM (2016). I chose to research Izzy Medrano as his art and concept art was related to the theme of one of my game ideas and was set in the same time period that I was interested in recreating. I also enjoyed Izzy Medrano's concept art, as well as the details and annotations in some of the which gave me an idea of what I needed to include.
 |  |
|---|---|
 |  |
 |  |
 |  |
 |  |
 |  |
 |  |
Environment Research
 |  |
|---|---|
 |  |
 |  |
 |  |
 |  |
 |  |
 |  |
 |  |
 |  |
 |
Whilst researching environments, the first thing I considered looking at was fantasy themed concept art that would be related to the type of world I would like to create. I researched these images of concept art as I thought they were detailed and portrayed well the type of environment they were designing. I chose these concept art illustrations due to the similarities between what I wanted to do an these illustrations, They served as inspiration to create my own concept art and environment and gave me an idea of the industry standard.
Fantasy
After looking at some fantasy concept art I decided that I should research some graveyard environments as my intention is to have a graveyard section in my game level. I took a look at both concept art and some graveyards in games, specifically in Bloodborne as this game was fitting with the idea that I had for my environment and had really detailed environments. Bloodborne also had some dark environments, similar to what I have designed for my game level.
 |  |
|---|---|
 |  |
 |  |
 |
Real Graveyard
 |  |
|---|---|
 |
I decided to look at a few real graveyards that were from or resembled medieval graveyards and that specific time period to see what real ones looked like compared to concept art and games. These graveyards were incredibly similar to what I wanted to include, and the layout of the tombstones as well as the design of these heavily influenced my project as well as the designs of my graveyard and my tombstones.
Fantasy city and streets
For my city environment I decided to look at fantasy cities and streets. I looked at concept art as well as images from some games such as Thief and Bloodborne. I chose these specific environments as my research because they were fitting to the theme I chose. One of the environments, Bloodborne, is also a game that I own and have played before, where I could play myself again to take a closer look at the environments myself.
 |  |
|---|---|
 |  |
 |  |
 |  |
 |  |
 |  |
Real medieval
 |  |
|---|---|
 |  |
 |  |
 |  |
After looking at concept art and images from games I researched some real medieval environment, including some modern cities with medieval buildings and roads. These images of real environments helped me get an idea of what real medieval cities were like, as well as giving me ideas of the potential layout of the city in my project.
Game wireframe example: The Order 1886
Whilst doing my research I found this image and thought it would be a good reference whilst designing and modelling my game environment. These wireframe examples show me the detail of the buildings and props as well as giving me an idea of how they were modeled.
 |  |
|---|---|
 |  |
 |  |
 |
Designing the game


This is the concept art for my main character. I was aiming to create a skeleton mage, which is shown by the magic above his hand. As reference I used some of the research I have previously done, such as the main character from Darksiders 2 which had a major influence on the design of my character.


Here I have done the concept art for a basic enemy. This enemy would be a simple skeleton warrior with a sword. The version on the left is a normal one and the version on the right is a more powerful one with a weapon that has a magical effect. In this case, the magical effect is fire. However, this fire is green as it is a demonic fire that is only used by the enemies.


This is the concept art that I have created for the graveyard part of my level. For this concept art I used real mausoleums and tombstones as reference.


Development of the game
Here I am showing my initial starting point when modelling the lamp that I will use for my game. I started off with a cube and used the bevel tool to create the inward edges at the bottom. Once I created this I extruded upwards in the center and used the bevel tool once more to replicate this edges. This is the base of the lamp and from here I will model the lamppost and the lamp itself at the top.
This is the lamppost along with the lamp. The lamppost was simple as all I had to do was create a cube. However, to create the lamp I extruded from the top of the post twice to create the base of the lamp and I then extruded inside the base to create a square of edges in the center. I used this to extrude upwards and then create the lamp itself. Once I created the lamp I extruded at the top of it to create a triangular shape, which would then act as the top of the lamp.


Here is the final version of the complete lamp, with both parts included. This will most likely be used in the graveyard section of the level, and I will either reuse this with a changed design or model a new lamp from scratch for the normal city section to make them have a difference.
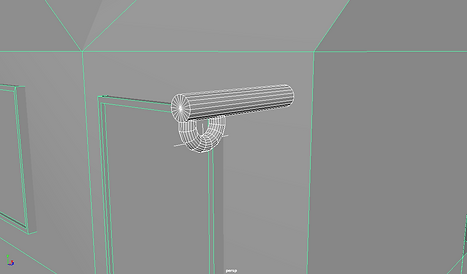
To create the base of my pillar, I created a simple cylinder. Once I created it, I extruded at the top of it to create a smaller circle and then extruded once more upwards to create the extension. I repeated this to complete the base of the pillar.


To finish off the pillar, I created a cylinder and adjusted it size so that it was similar to what I was aiming for. After this, I duplicated the pillar base and inverted its angle to make it look in the opposite direction. Once I did this, I placed it at the top of the pillar to create the end of it. By doing this I saved time, as instead of remodeling the top I instead reused the bottom.
My first step towards creating a tombstone was to create a cube that would act as the base at the bottom. I extruded the top of this base to create a smaller side and then extruded this side upwards. Once I did this I use the edge loop tool to create an edge near the top for when I decide to extrude inside. I also use the revel tool to create the inward edges at the top.


In this step I did some extrusions on the inside of the tombstone. This was done to create the shapes where there would be text that would be the names of the people as well as the messages from their family.
This is my finished tombstone. I cleaned up some edges and added some to even out the edges of each side.


Here is the start of one of the tombstone variations I created. I used the bevel tool to create the curved edges and then used the extrude tool to create the sides of the tombstone.
I used the same method to continue the tombstone. However in this step I also decided to reduce the scale of it as I thought it was too thick and didn't look right.
I used the same method to continue the tombstone. However in this step I also decided to reduce the scale of it as I thought it was too thick and didn't look right.


This screenshot shows the start of the mausoleum. I imported the pillar I created previously to make it a part of the mausoleum and then created some basic cubes to be the base and starting point of the modeling process.
After this I used the extrude tool to create the steps of the mausoleum. I was careful when extruding to make sure each step was the same or similar size as well as they were correctly leveled towards the mausoleum.

Once the steps were created I used the magnet tool on the base to build a cube on top of it. I adjusted the size of this cube and then used the extrude tool at the top of it to create the roof. Once the roof was created I then used the extrude tool at the front of the extruded roof so that it was also on top of the pillars, thus showing that the pillars are a support point for the mausoleum and the roof.
In this screenshot I have created the basic shape of the door with a simple cube. This shows where I initially planned to position it as well as what I had planned its size to be.


I used the bevel tool to arch the top of the cube by selecting the two side edges at the top face of it and adjusted it accordingly. I did this as when looking at references as well as my concept art I noticed that most of the doors of mausoleums had this arched shape.
This screenshot is showing some experimentation that I did not keep. I duplicated the door multiple times and used the boolean tool to create some indents which would show a type of archway for the door. However, although I liked this idea at first, I was not pleased with the end result and decided to redo and change this.

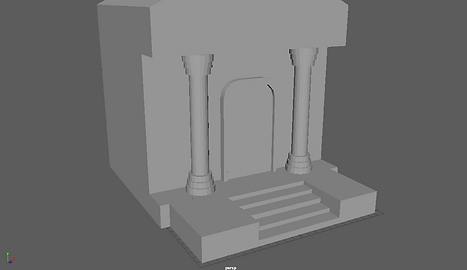
Based off of my previous and failed idea, I duplicated the door once and used the boolean tool to create one single archway for the door. I thought that this design was more suiting and also looked better, therefore I decided to keep this one instead of the previous one.

This is the base of the first building that I created. To create the base I simply created a cube and use the edge line loop tool to create a face that I would then delete to achieve the shape that I wanted. In the place of this deleted face I create a cube which I divided to create the set of stairs positioned. At the bottom of the building I also created a bottom entrance. To create this I first created the door and gave it the size that I wanted. After this, I duplicated the door twice. One of these duplicates were used to boolean with the building and create a space for the door. The other duplicate was used as the door frame.

Once I finished the bottom floor I moved onto the top floor. To create this I extruded the top faces of the base building to a suitable height. I then did the same process I used for the bottom floor, with the extra step of duplicating the door at the bottom to make sure that both doors were the same size.
This screenshot shows the roof of my building. This took me a while as I was unable to figure out how to correctly extrude to make the roof be shaped the way I was aiming.

 |  |
|---|---|
 |
Here is a gallery showing the windows of the building. The process I used was essentially the same one as with the door, as I found this to be a useful process. However, there is one window that is triangular. For this window I used the bevel tool at the top face to create the triangular shape.
This screenshot shows the start of my modeling for the sign post. The base post was made by creating a simple cylinder and re-scaling it accordingly. However, the bottom part was created by using the bend tool. I had to create and size a cylinder accordingly, and then subdivide it horizontally. These subdivisions were necessary for the bend tool to work correctly and create the shape and bend that I wanted, as without the subdivisions there are less faces for the tool to use.

Here is the part from which the banner/flag would hang from. This was simple to create, as all I needed to do was create and resize a cylinder.
This is the base of the flag/banner. I simply created a cube and resized it to plan out where it will go and what size it needed to be.


Once it was correctly sized and positioned, I used the bevel tool at the bottom to create this triangular shape. I find the bevel tool to be very useful for creating this, as it is simple to use and creates it effectively
Later on whilst modeling other parts of the building I noticed that the scale of the flag/banner was slightly off and decided to go back and adjust it.

 |  |
|---|---|
 |
This gallery shows the framework of the house. This was simple to create, as all I had to do was use the magnet tool to create a cube and then re-scale this. After creating one I could simply reuse this for every wall by simply adjusting the length.
Here is some support that I created for the passageway up the stairs. I did this by creating a cube and resizing it accordingly in the two different steps where they are located, and duplicating them once in their according place. For the top ones connecting them I simply duplicated one of the cubes and then resized and rotated it, then duplicated these onto the other side.
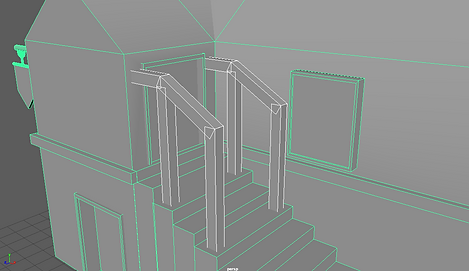

I then duplicated one of the top supports and rotated and resized accordingly so that it would fit well and also connect both sides.
I duplicated this one and then placed it on an upper position to connect the two sides once more.


Once I finished I decided to re-scale these parts as their size seemed incorrect for me as well as not being correctly positioned.
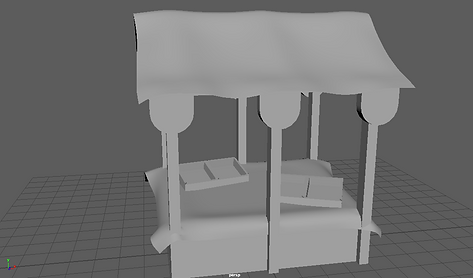
This is the base of the stall. I simply created a basic cube with the polygon tool.
Here I have created a stand in the shelves where items that can be bought would go, as well as the first support. To create the shelves I created a cube and then used the edge line loop tool to create an edge in the middle. This separates it into two faces, which I then individually extruded inwards and then downwards to create these openings. Once I finished one of them I instanced it to have two. I used instanced in special duplicate instead of normal duplicate so that both of them are changed at the same time if I need to adjust something.


After this I instanced the stall support multiple times and placed one in each corner as well as in front of the first one I created. To place each one of them accurately I used the top view as well as the wireframe view that allowed me to view all of the edges to line them up.
Once I finished placing the supports I grouped them together. After grouping them I then created a cube that I placed in front of one of them. which would be used to create a sign for this stall.

To create the sign I resized the group accordingly as well as using the bevel tool on the lower edges to create the shape that I desired.
Here I have changed the positioning of the sign as it wasn't correctly aligned with the support. To give it a correct positioning I used the top and front views with the wireframe view as these allowed me to view the edges easier such as like I did before.

In this screenshot I am showing the supports that are connecting the base supports. To create this I created one initial cube which I resized and re-positioned until it fitted correctly. I then used the edge loop tool along with the views I used previously for correct alignment to correctly separate the faces of this shape and extrude towards the next support.
Here I have completed the outer supports that go around the stall joined with the base supports. I used the same technique for all of the sides which was explained previously.

Once I completed the outer supports I created one down the middle that would complete this support system. To create this I used the top view as well as the edge loop tool and wireframe view to correctly place all of the edges needed to have the faces correctly separated. Once this was done I extruded the main face that would go to the other side. However, I extruded both face which caused them to stop at the middle.
To make the stall more realistic as well as less plain I decided to rotate the stands as this would make it look less simple.


In this screenshot I worked on the base of the roof for the stall. To create this I made a cube which I scaled and rotated accordingly. Once it was scaled and rotated I mirrored it to create the other half of the shape. After I did this I simply instanced it twice and placed it throughout the roof.
Here I am showing some adjustments that I made to the stall. I adjusted the base of it for it to be slanted. I did this by selecting the edge that was going to be moved upwards to add this effect.


This is the finished stall alongside the roof. I wanted the roof to had a cloth look to it. To do this, I created a plane and then I use the ncloth tool on it as well as creating collision for the stall. I let it fall onto the stall and stopped on a frame that I liked. Once on this frame, I duplicated the cloth to keep the shape and then deleted the ncloth and collision.
I created another cloth for the base of the stall to make it look more realistic. I also decided to smooth the cloth on the top and on the stall as I thought that it would look more natural, as leaving it the way it was made it look too much like a normal square with rough edges.

To create the base of the well I created a cylinder and extruded the inside of it to form the base. Once the base was formed I then extruded further to create the well itself. After this I created a cube which I scaled and then duplicated.
To create the roof of the well I created some cubes which I sized and rotated to connect the supports with the roof. After this I created a cube which I extruded to create the roof of the well.


For this part of the well I created a cylinder that would go in the middle as well as two cubes which I scaled equally and then rotated differently.
To create the well's handle, I created, scaled and repositioned a cylinder so that it was correctly shaped and located. After this I extruded it multiple times whilst also rotating this face to extrude in the direction that I wanted. By doing this I created the shape that I wanted for the handle.
 |
|---|
 |
 |

This is a bucket I created to complement the well. I created a cylinder which I extruded and then another cylinder on which I used the bend tool to create the shape that would be the bucket handle.

Here is a screenshot of the finished well.

These are the potion vials that I modeled to be placed in the stalls. I created a cylinder and shaped it accordingly, and then created another cylinder which would be the part that closes the vial. For both of these I used the smooth tool to achieve the desired look

I created these books to place them in the stall. To create them I created a cube and then extruded the faces outwards. I then extruded these faces again which allowed me to create a book the way I wanted it to look, which I then simply duplicated.

My first step towards creating a crystal was to make a cube and then resize it to a size that I thought was appropriate.

I then extruded the upper and lower face to create the ends of the crystal.

After this I used the bevel tool to create the shape of the body which makes it look like a crystal.
I firstly created one of the outer towers that surround the clock tower. To do this I created a cube and then extruded the upper face. I further extruded it a few times to achieve the shape of the tower.


I duplicated the tower and placed it on the other side of the clock tower. I then created some shapes that go on both side as well as using booleans to create some inner parts on the main clock tower.
This is a zoomed out look of the current progress.


I used booleans on the back of the clock tower to create these inner sections once again.
Here I have duplicated the two towers on the front to place them on the back. I also had to rotate them accordingly.


I proceeded to create booleans on both sides of the clock tower to create the inside sections.
I proceeded to create booleans on both sides of the clock tower to create the inside sections.

 |
|---|
 |
This is the start of the modeling of the clock section of the clock tower. I created a cylinder at first and sized it accordingly. After sizing I extruded the cylinder to create an inner circle which I then deleted this shape. I then created another cylinder and followed the same steps to create a shape that would go on the inside and would stick out.
 |
|---|
 |
 |
Here I started modeling the three gears that would go on the clock. To create them I simply created some cylinders which I shaped and resized accordingly. I also used the extrude tool to create inner sections which were either deleted or then further extruded.
 |
|---|
 |
 |
 |
 |
This shows a closer look of the gears, as well as my process whilst giving them more detail and adding the ends of the gears. I modeled and sized one of them, and then duplicated and rotated it to be positioned correctly. I repeated this multiple times for each gear.
In these screenshots I am showing the decorations that go in the inner sections that I created earlier on the clock tower. To do this I simply created one cylinder which I extruded and then created another cylinder which was resized to create an inner circle.
 |
|---|
 |
 |
 |

This is the top section of the clock tower. To create this I first created a cube and extruded it to create the roof of it. Once I modeled this part I created a cube which I modified to be shaped in a specific way and then adjusted the size so that it went through to the other side. After this I used the boolean tool to create the inside of this section.
Here I have modeled the outer section of the upper tower. To do this I created a cube and then extruded and rotated accordingly to create this shape.


In this screenshot I am showing that I have also modeled a spike that goes on this section. To model this I create a cube which I then extruded to create the spike.
After creating the spike I created a small tower by creating a cylinder and then rotating the top of it.

 |
|---|
 |
 |
In this gallery I am showing screenshots of how I created the bells. To model the bell itself I created a cylinder which I used to model the bell by extruding it following a template. I then smoothed the cylinder as this made it look more natural. After this I modeled the support that joins the bell with the outer section by using the same method as well as smoothing it when I was finished. I also modeled the inside of the bell by simply creating a cylinder and adjusting its shape.
Here I am showing some clocks that I modeled that would go on top of the tower. To model the base I created a cube and then used the bevel tool at the top to create this arched shape. After this I created a cylinder which I extruded to create the inner circle as well as creating a cube and extruding it to create the shape I wanted. I then duplicated this twice and scaled it once to create a bigger version.
 |
|---|
 |

This is a screenshot of the finished modeled version of the clock tower.
I had to remodel the top part o the clock tower as the holes I created with booleans were causing some errors. Due to this I also decided to alter the design by not creating these openings.

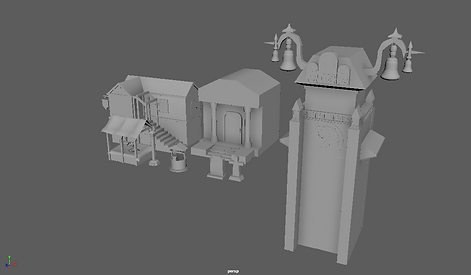
These are all of the assets I currently have in one file. I only included one house as I am going to reuse the assets I used on it to create variations of it.

This is a rough layout of my level with the current models that I have. The houses that repeat themselves will be changed with variations of that house so that it does not look repetitive, however I used the one that I currently had in this file to do a rough representation of what the town would look like. The blue lines that can be seen are used to represent the walls that will shape the town.

Here I have rearranged the placement of some buildings as well as developing the outer wall of this area. I decided to change the position of some buildings as I thought that it would be more fitting this way
These are some basic spheres that I created. They will represent stones that have an elemental affinity to them, which will be fire, earth, ice, water, toxic and darkness. I assigned only one material to all of them, as I will change the material in Unity for each element.


I created an alternative window design for one of my buildings. To create it, I initially created a cube and adjusted the scale of it to adjust it to the idea that I had in mind. Once this was done I used the bevel tool on the two front sides to create the outer shape of the glass. I also use the extrude tool on the top and bottom faces multiple times to create the window frame, which proved to be slightly complicated at first as I tried to extrude them separately at first, which wasn't as efficient and effective as extruding both at the same time.

For one of my buildings, I decided to create a balcony. My first step towards modelling this was creating the base, which was the most simple part as all I had to do was scale the size of it. To create the support railings, I created one of them which I adjusted correctly and then used the shift + D duplication which continuously duplicates them with the same space in between the objects. I had to try this method multiple times until i got the distance right, which I then had to also do multiple times when putting them across to the other side. However, on the other side I simply duplicated the other side onto it. To create the top I used one single cube which I extruded.

This screenshot shows three features of one of the alternate buildings; the framework, the rectangular window and the frame of the building on the bottom. For the framework I used the same technique as for the top of the balcony railing, which was to extrude one single cube across. For the rectangular window I created a rectangular cube and extruded all the sides except front and back multiple times to achieve the frame. For the bottom frame of the building, I simply used the edge line tool to create a face that went across where I wanted and then extruded these faces outwards, which created this shape.
Here is a differently shaped window, as I decided to go for this based on my research, mostly my primary research which inspired me to go for this shape. To create this circular window I created a cylinder and then extruded the inner faces to create the frame and glass at the same time. I then created a cube which I adjusted the scale for once so that it would fit the whole window and then duplicated and rotated. I had to rotate it so that it would go across the window horizontally instead of vertically.

 |
|---|
 |
This is the gates that I modelled for my city, which suggests travel from one zone to the other. Initially, these were going to be much more simple, wooden gates. However, as I had some spare time left, I decided to go for a more complex design which would be these spiked, metallic gates. To create them, I created one single spike through a cube which I used the bevel tool on and then used the shift+D duplication. I did this same method for the metal bars that go across horizontally. For my second gate I had to reduce the number of spikes as well as the horizontal size of the bars, which required me to then give them a different UV map for the textures.


I textured the clock tower in Substance Painter. The clock tower was difficult to texture, as I found multiple errors that I had to fix within the mesh as well as within material assigning and UV mapping which were my fault. It was a challenge to successfully texture the clock tower due to this, and this is the final result shown in Unity.
Texturing these in Substance Painter was one of the most enjoyable things for me in this project. I tested the emission channel inside Substance Painter and how it worked, and managed to achieve these results through adjusting several options. The design of this is one of my favourite in the project, as I really enjoy the emission of the colours and the combinations of them.
 |
|---|
 |
 |
 |
 |
 |
These books were the most interesting to texture, as for these I decided to try out alpha images to create details in the textures. It was a slight struggle to create the alpha images for some of the images, as I had to take them into Photoshop and do adjustments to them. However, I learned a lot about how alpha brushes worked as well as techniques involving this, which I thoroughly enjoyed.
 |
|---|
 |
 |
 |
These screenshots show the textured potions. I decided to go for blue and red colours as references to magic and health potions, which are present in most games of this genre and setting. I used emission channels for the colours and changed the material of the outside of the potions so that it would be transparent which would then show you the inside whilst also making it noticeable that there is an outside to the potion. I also added a glass texture to the outside, however this texture isn't as noticeable as it could be due to the transparency.
 |
|---|
 |
 |

For the well, I decided to take a render in Substance Painter to see what it could look like in Unity, which I took a screenshot of to show the menu of the render as well as the render itself. I really like the detail that can be seen in the bucket, the handle and the rope.
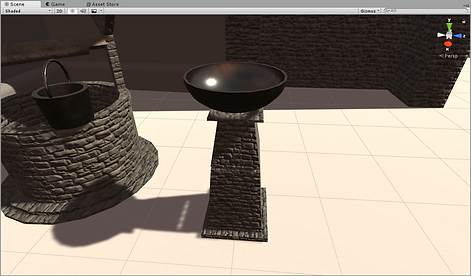
When texturing my brazier, I decided to look at some references online. I saw that many had stone bases with metal at the top, and decided to recreate this with my own materials.

For the lamp, I used a texture that gave the glass some detail and kept the rest of the body and the top metal. I went for a metal that seemed medieval, and slightly hammered, as I thought this would give it a bigger feel of fantasy and medieval.
These are my stalls textured. This screenshot is from unity, as I only textured one of them in Substance painter and I wanted to show both of them. I used a wood texture for the supports, base and shelves and used cloth textures for the roof and cloth on the table. The cloth texture for these was different for each, to show that they were different, and gave the one across the table a dirtier look as this would make it seem like it is being used more often than the one on the roof. For the signs that go across the stalls I used an alpha brush which was a shop sign.


I used a Substance Painter render to show my textured mausoleum. I used a marble texture for the base as well as for the pillars, and then decided to use brick for the mausoleum itself. For the door, I used a dark metallic texture to which I applied and alpha brush that gave it some detail. This was a complicated process, as I used a photograph of a real door of a mausoleum and had to make adjustments to it to make it black and white, which would make it an alpha. I then tried using it, and noticed the size was not correct to make the whole door, so I thought of halving the image. This step worked, and allowed me to create two halves, one on each side of the door.

 |  |
|---|---|
 |  |
These are my textured buildings. One of them doesn't have a textured door because I used the same textures as I did for another door in Unity. Two renders are from Substance Painter, and the other two are from Unity as I did not export these with their doors to Substance Painter due to them already being textured before.
Unity & Playthrough

This is a whole overview of my textured level inside unity. The outside of the outer wall was left untextured, as the player would not see this and it would therefore be unneeded. The towers were also textured in Substance Painter, as they are close enough to be seen in a bit of detail.
These are some particle effects I used in my level. I used a Unity prefab, and altered it to have it different sized from the prefab as well as different colours near the mausoleum. I decided to go for a green colour near the mausoleum as it is a colour that represents necromancy in fantasy settings, which is fitting as this game would feature undead enemies. I placed these on the braziers as they would have been quite empty without fire.

Evaluation
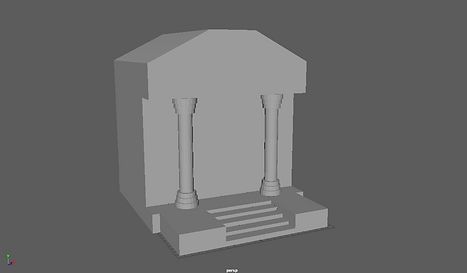
The aim of my project was to model and texture a 3D environment that could be used in a game level. My concept was to make this environment medium sized, with a main town area accompanied by a graveyard. The setting of this environment was designed to be medieval and fantasy, with magical elements and effects included, all based around the genre of the game it would be included in which would be a RPG (roleplaying game). I believe that I have met these intentions, as my end product was what I had planned from the start with the exception of creating a character as this was planned to be done if I had extra time.
The research I did was successful in developing my project as I used a lot of the research when doing concept art as well as whilst modelling my 3D objects. I did some primary research whilst I was on holiday, as I visited a village in Spain which had some buildings that had a medieval/fantasy look, which was related to my project and gave me some ideas as to what I could model. This research was fairly relevant and important to my project, as some of my models were based on what could be seen in the photographs that I took. The most relevant research of my FMP was my environment research, specifically the graveyard research, as the research that I did for this section really influenced the way I planned it out and designed it, including heavily affecting some of my designs. Whilst doing my research, some of the most important and relevant things that I learned were 3D modelling and texturing techniques, as these were vital to doing some of the models that I did as well as to making my models look as good as they did. Researching Substance Painter techniques and functions was really important, as I learned more about channels, such as emission which allowed me to give some objects a glowing effect, and alpha’s which helped me put detail in my models through textures instead of modelling them into the model. I relied a lot on my subject knowledge to help with my project as I had to rely on my own skill to create everything that I did, as I only looked up specific techniques or problems that I had and not tutorials of how to create specific objects, as I wanted to tackle this on my own and figure out how to model something by myself, which in my opinion would improve my skill and would be a step forward.
My idea development stage was based around me looking at my research and finding inspiration on it, and then creating some concept art and a level map based on the ideas that I came up with through my research as well as through what I had initially planned to create, which would mostly determine the theme of these concepts. Through testing and experimentation, I came up with some designs that I enjoyed by using tools in Maya that I had not used before, as well as making textures look better and differently in Substance Painter by altering options that I had not tried before. This also allowed me to learn a lot about both programs as well as about 3D modelling and texturing. Because of this, idea development and experimentation vastly helped the development of my project as idea development helped me come up with designs that I based my models and area on as well as coming up with new techniques and some models that came purely from experimentation that I liked and decided to keep in my level. For problem solving, one of the biggest problems that I had was in the clock tower that I had modelled, as the first time I modelled it I created a space at the top with the Boolean tool which caused some errors in the vertices, edges and faces. This error, which I was unable to fix, caused me to take a step back and remodel certain aspects of the clock tower. Luckily, through incremental saving, I had a Maya file that contained a version of the clock tower which did not have this space in it, which saved me some time. Due to this error, I plan on being more careful with Booleans in the future to avoid this type of problem happening again, as if I didn’t have this save file this would’ve been a much bigger problem which would’ve been harder to fix. However, I believe that modelling and texturing are some of my strengths as I am proud of some of the models I did, such as the previously mentioned clock tower. I am also proud of my texturing, especially the ones involving alphas, as some of these involved image manipulation to create alpha vectors. My biggest weakness, in my opinion, is UV mapping and assigning materials to my objects. I believe this because I erroneously did this multiple time with my objects, which caused me to constantly redo this steps and therefore lose some time in the same section by having to repeat it multiple times.
I decided how I was going to make my final outcome at the same time that I decided what my final outcome was going to be, as I decided it would be a game level and this allowed me to quickly and easily decide what programs and methods would be used. However, I did initially using Unreal Engine instead of Unity as my game engine as I am interested in testing Unreal Engine and working with it. However, I decided that it would be a better and smarter choice to use Unity as I was used to working with it and did not have time to grow accustomed to and learn how this new game engine would function. The methods I used to produce my work were modelling objects in Maya by mostly using the extrude and bevel tools, which were certainly the most important ones in the development of this project, and then apply UV maps and materials to them. Once this was done, I would export them as a FBX file and then import them into Substance Painter to apply texture and materials to them, which I would alter to make the more unique. I would then export these textures and put everything inside Unity, the game engine, which is where my final outcome would take place. My choice of methods enabled me to fulfil my statement of intent by allowing me to create good models through Maya and really high quality textures through Substance Painter, as well as to record some gameplay of my level by using the Unity game engine. These methods were really successful, as I managed to create all the models that I wanted to a high standard and was able to texture everything the way I had initially planned, with improving over what I had planned at first by learning some new techniques and new things about Substance Painter. The strengths of working in this way was that, as I was used to all of the programs that I was using and was moderately skilled at using them, I was able to do everything that I had planned with relative ease and quickness. However, one weakness is that, from my personal experience, Maya is a program that has a slight tendency to crash occasionally which provides some problems when trying to work quickly. Another big weakness of working this way is that, although Substance Painter is a phenomenal program to apply textures, it is not available in the Mac that I was using at college and was therefore only able to use this program on my own personal computer on which I had it installed.
I would not have changed anything about my methods if I could extend or re-work my project. However, I would thoroughly consider using Unreal Engine instead of Unity, as I believe Unreal Engine would allow for a higher quality final outcome.
My intended audience was fans of the RPG genre that were, as a minimum, teens. I would expect my viewers to play through my level and enjoy the graphical level of it as well as the medieval fantasy theme that it has. I believe my FMP answers my original statement of intent, as I have created a high quality game area that stuck to the theme of medieval fantasy RPG.
I believe that it was really successful as a final body of work due to the quality of the models, textures and game level. The only change that occurred in my project was the design of the clock tower, as I had to change it due to the problems that I previously mentioned. The people that have seen my final outcome believe that it was really good and were mostly impressed with the level of detail of the textures. My website was important to manage my project, as looking at it allowed me to see my statement of intent, research and everything I had done with ease.
For time management, I had planned to do my 3D modelling and website management at college, and do all of the texturing at home using Substance Painter. I mostly managed my time as intended, however I had to do some modelling at home instead of at college due to some difficulties that Maya gave at college as well as due to not having enough time to only model at college.